一、镜像和容器
docker中的镜像和容器对应linux环境中的程序和进程,不运行时是一个静态的二进制文件,运行就成了系统中的一个进程。docker运行时被称作容器,静态的文件则被称作镜像。
镜像是docker三大核心中最为重要的,因为运行docker首先得要有镜像。而镜像的来源有多种,可以从官方仓库获取,也可以手动制作。默认情况下启动一个镜像,如果不存在于本地,会从镜像仓库获取。
1.1 获取镜像
如果想要从镜像仓库获取镜像,使用 docker pull 命令就可以完成,例如:
ma@Y485:~$ docker pull hello-world
Using default tag: latest
latest: Pulling from library/hello-world
9db2ca6ccae0: Pull complete
Digest: sha256:4b8ff392a12ed9ea17784bd3c9a8b1fa3299cac44aca35a85c90c5e3c7afacdc
Status: Downloaded newer image for hello-world:latest
仓库中的镜像包含两部分:镜像名和版本,版本字段可以省略,默认使用latest。
例如我们要获取ubuntu 14.04镜像,可以使用下面的命令完成:
ma@Y485:~$ docker pull ubuntu:14.04
14.04: Pulling from library/ubuntu
8284e13a281d: Pull complete
26e1916a9297: Pull complete
4102fc66d4ab: Pull complete
1cf2b01777b2: Pull complete
7f7a2d5e04ed: Pull complete
Digest: sha256:71529e96591eb36a4100cd0cc5353ff1a2f4ee7a85011e3d3dd07cb5eb524a3e
Status: Downloaded newer image for ubuntu:14.04
1.1 查看本地镜像
查看本地已有的镜像可以通过命令 docker images 或 docker image ls 完成:
ma@Y485:~$ docker images
REPOSITORY                TAG                 IMAGE ID            CREATED             SIZE
tvial/docker-mailserver   latest              dac8816ec078        3 days ago          517MB
hello-world               latest              2cb0d9787c4d        5 weeks ago         1.85kB
shiningrise/hustoj        latest              bbbf10eeee29        8 weeks ago         490MB
ma@Y485:~$ docker image ls
REPOSITORY                TAG                 IMAGE ID            CREATED             SIZE
tvial/docker-mailserver   latest              dac8816ec078        3 days ago          517MB
hello-world               latest              2cb0d9787c4d        5 weeks ago         1.85kB
shiningrise/hustoj        latest              bbbf10eeee29        8 weeks ago         490MB
显示的结果中包含了镜像名,版本号,镜像ID,创建时间和镜像大小等,镜像ID是用来标识镜像的唯一ID。
1.3 搜索仓库中的镜像
使用docker search命令可以在远程仓库中搜索想要的镜像:
ma@Y485:~$ docker search hello-world
NAME                                       DESCRIPTION                                     STARS               OFFICIAL            AUTOMATED
hello-world                                Hello World! (an example of minimal Dockeriz…   624                 [OK]
kitematic/hello-world-nginx                A light-weight nginx container that demonstr…   108
tutum/hello-world                          Image to test docker deployments. Has Apache…   53                                      [OK]
....
默认会显示镜像名,镜像描述和star等信息,OFFICIAL表示是否为官方镜像,如果标有[OK]则表示是官方的,最后的AUTOMATED表示是否为自动创建的镜像。
search中提供了一些筛选的选项:
-s, --stars=n : 老版本中用来筛选star用的,表示只显示star大于等于n的镜像。新版docker用 --filter=start=n 来筛选。--no-trunc=truc|false : 是否截断描述信息,默认情况下描述超多长度之后会被截断成...显示。
# 查找star大于500的hello-world镜像,且不截断描述信息。
ma@Y485:~$ docker search hello-world --stars=500 --no-trunc
Flag --stars has been deprecated, use --filter=stars=3 instead
NAME                DESCRIPTION                                          STARS               OFFICIAL            AUTOMATED
hello-world         Hello World! (an example of minimal Dockerization)   624                 [OK]
1.4 镜像标签
镜像标签类似于linux中的 alias ,相当于给镜像取了别名:
ma@Y485:~$ docker tag ubuntu:14.04 myubunt
ma@Y485:~$ docker image ls | grep ubuntu
myubuntu                  latest              971bb384a50a        4 weeks ago         188MB
ubuntu                    14.04               971bb384a50a        4 weeks ago         188MB
新创建的标签镜像和实际的镜像ID都是相同的,指向了同一个镜像。
1.5 删除镜像
docker rmi 可以删除本地已经存在的镜像,删除镜像可以使用 镜像名+标签 或 镜像id 完成。
例如当前 hello-world 镜像的id为 2cb0d9787c4d ,把它删除:
ma@Y485:~$ docker rmi 2cb0d9787c4d
Untagged: hello-world:latest
Untagged: hello-world@sha256:4b8ff392a12ed9ea17784bd3c9a8b1fa3299cac44aca35a85c90c5e3c7afacdc
Deleted: sha256:2cb0d9787c4dd17ef9eb03e512923bc4db10add190d3f84af63b744e353a9b34
Deleted: sha256:ee83fc5847cb872324b8a1f5dbfd754255367f4280122b4e2d5aee17818e31f5
值得注意的是:如果容器镜像已经被运行了,即使容器处于停止的状态,镜像也是无法删除的。
ma@Y485:~$ docker rmi 2cb0d9787c4d
Error response from daemon: conflict: unable to delete 2cb0d9787c4d (must be forced) - image is being used by stopped container 5549f206097
这里提示镜像无法删除,应为有一个容器 5549f2060977 正在使用它,查看此时运行的容器:
ma@Y485:~$ docker ps # 查看所有正在运行中的容器
CONTAINER ID        IMAGE               COMMAND             CREATED             STATUS              PORTS               NAMES
ma@Y485:~$ docker ps -aq # 查看运行中或者已经停止的容器,-q表示只显示容器id
85d2d2aa258a
d383073e1d32
5549f2060977
可以看到有一个已经停止了的容器 5549f2060977 ,它在占用 hello-world 镜像,删除经向前要把这个容器也删除了才行,删除容器使用 docker rm :
ma@Y485:~$ docker rm 5549f2060977 # 删除容器
5549f2060977
ma@Y485:~$ docker rmi 2cb0d9787c4d # 删除镜像
Untagged: hello-world:latest
Untagged: hello-world@sha256:4b8ff392a12ed9ea17784bd3c9a8b1fa3299cac44aca35a85c90c5e3c7afacdc
Deleted: sha256:2cb0d9787c4dd17ef9eb03e512923bc4db10add190d3f84af63b744e353a9b34
Deleted: sha256:ee83fc5847cb872324b8a1f5dbfd754255367f4280122b4e2d5aee17818e31f5
当镜像存在多个标签的时候,删除镜像只是删除了镜像的当前标签,实际的镜像并没有删除:
ma@Y485:~$ docker image ls | grep ubuntu # 当前有两个ubuntu镜像,有一个是镜像标签,实际都是一个镜像
myubuntu                  latest              971bb384a50a        4 weeks ago         188MB
ubuntu                    14.04               971bb384a50a        4 weeks ago         188MB
ma@Y485:~$ docker rmi myubuntu # 删除myubuntu标签
Untagged: myubuntu:latest
ma@Y485:~$ docker image ls | grep ubuntu
ubuntu                    14.04               971bb384a50a        4 weeks ago         188MB
最后能看到,删除 myubuntu 之后,镜像并没有删除,原来的ubuntu和镜像依旧存在。
1.6 查看镜像信息
每个镜像都有自己的详细信息,包括作者、版本以及镜像大小等相关信息,使用命令 docker inspect 即可查看:
ma@Y485:~$ docker inspect hello-world
[
    {
        "Id": "sha256:2cb0d9787c4dd17ef9eb03e512923bc4db10add190d3f84af63b744e353a9b34",
        "RepoTags": [
            "hello-world:latest"
        ],
        "RepoDigests": [
            "hello-world@sha256:4b8ff392a12ed9ea17784bd3c9a8b1fa3299cac44aca35a85c90c5e3c7afacdc"
        ],
        "Parent": "",
        "Comment": "",
        "Created": "2018-07-11T00:32:08.432822465Z",
        "Container": "6b6326f6afc81f7850b74670aad2bf550c7f2f07cd63282160e5eb564876087f",
        "ContainerConfig": {
            "Hostname": "6b6326f6afc8",
            "Domainname": "",
            "User": "",
            "AttachStdin": false,
            "AttachStdout": false,
            "AttachStderr": false,
            "Tty": false,
            "OpenStdin": false,
            "StdinOnce": false,
            "Env": [
                "PATH=/usr/local/sbin:/usr/local/bin:/usr/sbin:/usr/bin:/sbin:/bin"
            ],
            "Cmd": [
                "/bin/sh",
                "-c",
                "#(nop) ",
                "CMD [\"/hello\"]"
            ],
            "ArgsEscaped": true,
            "Image": "sha256:6bc48d210ad4c6bbb74e02e6196a9133b57107033c09e92cac12616cad30ebcf",
            "Volumes": null,
            "WorkingDir": "",
            "Entrypoint": null,
            "OnBuild": null,
            "Labels": {}
        },
        "DockerVersion": "17.06.2-ce",
        "Author": "",
        "Config": {
            "Hostname": "",
            "Domainname": "",
            "User": "",
            "AttachStdin": false,
            "AttachStdout": false,
            "AttachStderr": false,
            "Tty": false,
            "OpenStdin": false,
            "StdinOnce": false,
            "Env": [
                "PATH=/usr/local/sbin:/usr/local/bin:/usr/sbin:/usr/bin:/sbin:/bin"
            ],
            "Cmd": [
                "/hello"
            ],
            "ArgsEscaped": true,
            "Image": "sha256:6bc48d210ad4c6bbb74e02e6196a9133b57107033c09e92cac12616cad30ebcf",
            "Volumes": null,
            "WorkingDir": "",
            "Entrypoint": null,
            "OnBuild": null,
            "Labels": null
        },
        "Architecture": "amd64",
        "Os": "linux",
        "Size": 1848,
        "VirtualSize": 1848,
        "GraphDriver": {
            "Data": {
                "MergedDir": "/var/lib/docker/overlay2/96168c171bf2d3370860383cb4be12c68141940410bdd823a0ca04e19c77d0ee/merged",
                "UpperDir": "/var/lib/docker/overlay2/96168c171bf2d3370860383cb4be12c68141940410bdd823a0ca04e19c77d0ee/diff",
                "WorkDir": "/var/lib/docker/overlay2/96168c171bf2d3370860383cb4be12c68141940410bdd823a0ca04e19c77d0ee/work"
            },
            "Name": "overlay2"
        },
        "RootFS": {
            "Type": "layers",
            "Layers": [
                "sha256:ee83fc5847cb872324b8a1f5dbfd754255367f4280122b4e2d5aee17818e31f5"
            ]
        },
        "Metadata": {
            "LastTagTime": "0001-01-01T00:00:00Z"
        }
    }
]
docker history 命令可以查看镜像的历史信息:
ma@Y485:~$ docker history hello-world
IMAGE               CREATED             CREATED BY                                      SIZE                COMMENT
2cb0d9787c4d        5 weeks ago         /bin/sh -c #(nop)  CMD ["/hello"]               0B
<missing>           5 weeks ago         /bin/sh -c #(nop) COPY file:3c3ca82dfdb40d30…   1.85kB
二、镜像仓库
2.1 Docker Hub
docker镜像仓库是一个集中存放镜像的地方,docker pull 就是直接在这个仓库获取的镜像。
docker官方维护了一个公共的镜像仓库Docker Hub,里面有许多优质的镜像。
除了下载镜像,这里还能上传个人制作的个人镜像。
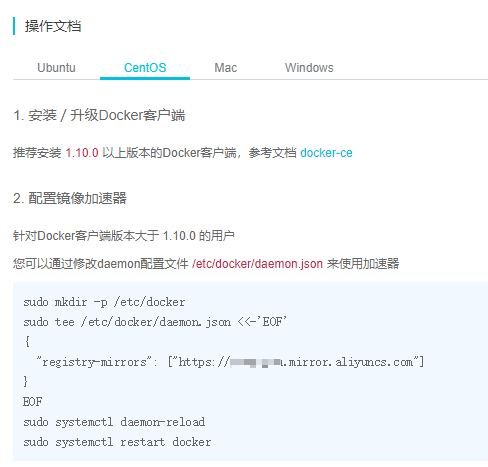
2.1 阿里云镜像加速器
docker安装后默认的仓库地址Docker Hub,对于国内用户来说速度比较慢,可以考虑替换为国内的镜像仓库。
国内的镜像加速器比较好的有:DaoCloud, 时速云, 阿里云等,这里介绍阿里云镜像加速器的用法。
登陆后,阿里云会分配私有的加速器地址,里面有加速器在不同系统下的使用方法,按照教程设置即可。
Ubuntu下的替换教程:
sudo mkdir -p /etc/docker
sudo tee /etc/docker/daemon.json <<-'EOF'
{
  "registry-mirrors": ["https://aketvpgu.mirror.aliyuncs.com"]
}
EOF
sudo systemctl daemon-reload
sudo systemctl restart docker
其他系统可以查阅: