分类 Linux运维 下的文章

setuid、setgid、以及黏着位

setuid的作用是以该命令拥有者的权限去执行,比如修改密码的passwd命令,执行passwd时会拥有root权限,不然就修改不了/etc/passwd文件了。

而setgid的意思是以命令所有组的权限去执行,它们的标志位是s,出现在x的地方,例如-rwsr-xr-x

手动添加这一位的方式:

> touch ls
> chmod u+s ls # UID权限设置
> ll ls
-rwSrw-r--. 1 ma ma 0 Nov  3 00:50 ls
> chmod g+s ls # GID权限设置
> ll ls
-rwSrwSr--. 1 ma ma 0 Nov  3 00:50 ls

对于以下程序:

#include <stdio.h>
#include <unistd.h>
#include <sys/types.h>

int main() {
    // 打印实际用户ID和有效用户ID
    printf("uid: %u euid: %d\n", getuid(), geteuid());
    return 0;
}

编译后加上UID权限,分别使用不同的身份运行:

> make setuid
gcc setuid.c -o debug/setuid
> ll debug/setuid 
-rwxrwxr-x. 1 ma ma 8552 Nov  3 02:24 debug/setuid
> chmod u+s debug/setuid # 加上UID权限位
> ll debug/setuid 
-rwsrwxr-x. 1 ma ma 8552 Nov  3 02:24 debug/setuid 
> sudo ./debug/setuid 
[sudo] password for ma: 
uid: 0 euid: 1000

可以看到,不管是以当前用户还是root用户运行,实际用户id都是一样的,都是其所有者。

二、黏着位(sticky bit)

关于黏着位找了很多资料也没有找到明确的描述,网上众说纷纭也没有清晰的描述出它的作用,最后还是在《UNIX环境高级编程》中找到一些更明确的解释:

The S_ISVTX bit has an interesting history. Onversions of the UNIX System that predated demand paging, this bit was known as the sticky bit.If it was set for an executable program file, then the first time the program was executed, a copy of the program’s text was saved in the swap area when the process terminated. (The text portion of a program is the machine instructions.) The program would then load into memory morequickly the next time it was executed, because the swap area was handled as a contiguous file, as compared to the possibly random location of data blocks in a normal UNIX file system. The sticky bit was often set for common application programs, such as the text editor and the passes of the C compiler. Naturally,therewas a limit to the number of sticky files that could be contained in the swap area beforerunning out of swap space, but it was a useful technique. The name sticky came about because the text portion of the file stuck around in the swap area until the system was rebooted. Later versions of the UNIX System referred to this as the saved-text bit; hence the constant S_ISVTX.With today’s newer UNIX systems, most of which have a virtual memory system and a faster file system, the need for this technique has disappeared.

在早期的unix系统中,如果一个程序被设置了黏着位,那么当它第一次执行结束之后,程序的正文段会被写入到交换空间中,以此加快后续使用的加载速度。因为交换空间是顺序存放,而磁盘上是随机的。它通常被设置成经常被使用的公用程序例如文本编辑器、编译器等,会一直持续到系统重启。

在后续的unix系统都设计了新的更快速的文件系统,所以这种用法逐渐消失。而对于这一黏着位“现在的用途”的描述是:

On contemporary systems, the use of the sticky bit has been extended. The Single UNIX Specification allows the sticky bit to be set for a directory. If the bit is set for a directory, a file in the directory can be removed or renamed only if the user has write permission for the directory and meets one of the following criteria:

  1. Owns the file
  2. Owns the directory
  3. Is the superuser

The directories /tmp and /var/tmp are typical candidates for the sticky bit—they are directories in which any user can typically create files. The permissions for these two directories are often read, write, and execute for everyone (user, group, and other). But users should not be able to delete or rename files owned by others.

现在的系统里面,黏着位已经被扩展了,它被用于目录权限上,如果一个目录设置了这一位,这个目录下的文件就只能被满足以下条件的用户重命名或者删除:

  1. 所有者
  2. 当前目录苏有这
  3. 超级用户

目录/tmp和/var/tmp是设置粘住位的候选者—这两个目录是任何用户都可在其中创建文件的目录。这两个目录对任一用户 (用户、组和其他)的许可权通常都是读、写和执行。但是用户不应能删除或更名属于其他人的文件,为此在这两个目录的文件方式中都设置了粘住位

手动给目录添加sticky位:

> mkdir 123
> chmod +t 123
> ll -d 123
drwxrwxr-t. 2 ma ma 6 Nov  3 02:18 123

加上这一个权限之后目录的颜色也有变化:

image

CentOS无法启动,启动分区无法找到,然后就报了个堆栈信息:

ACPI: wmi: Mapper loaded
dracut Warning: No root device "block: /dev/sda4" found
dracut Warning: Boot has failed. To debug this issue add "rdshell" to the kernel command line.

dracut Warning: Signal caught!
dracut Warning: Boot has failed. To debug this issue add "rdshell" to the kernel command line.

kernel Panic - not syncing: Attempted to kill init!
Pid: 1, comm: init Tainted: G I-------2.6.32-358.el6.x86_64 #1
Call Trace:
[<ffffffff8150cfc8>]? panic+0xa7/0x16f
[<ffffffff81073ae2>]? do_exit0x25/0x870
[<ffffffff81182885>]? fput_+0x25/0x30
[<ffffffff81073b48>]? do_group_exit+0x58/0xd0
[<ffffffff81073bd7>]? sys_exit_group+0x17/0x20
[<ffffffff8100b072>]? system_call_fastpath+0x16/x1b
Panic occurred, switching back to text console
*note1*: block device sought is not shown in /dev/fstab.

看样子是磁盘找不到了,想想前不久加了个磁盘装了其他的系统,会不会是影响了分区。

然后进去到另外的ubuntu系统,查看分区表:

image.png

发现分区全部挂在了sdb,然而实际上最开始装系统的时候磁盘应该是sda:

image.png

分析了一下分区信息,其中 sdb1-sdb7 应该就是我的CentOS分区了,50G的sdb4就是根分区,先把它挂载到当前系统。

ma@Y485:~$ sudo mkdir /sdb4
ma@Y485:~$ sudo mount /dev/sdb4 /sdb4/
ma@Y485:~$ cat /sdb4/etc/fstab 
# /etc/fstab: static file system information.
#
# Use 'blkid' to print the universally unique identifier for a
# device; this may be used with UUID= as a more robust way to name devices
# that works even if disks are added and removed. See fstab(5).
#
# <file system> <mount point>   <type>  <options>       <dump>  <pass>
# / was on /dev/sda12 during installation
UUID=8c9c0656-bd8a-41e0-8aae-43eaf8938227 /               ext4    errors=remount-ro 0       1
UUID=6b60d3c1-221b-48de-9819-eb41cfbdc0cc /boot           ext4    defaults        0       2
UUID=BAE5-8056  /boot/efi       vfat    umask=0077      0       1
UUID=122bd403-dd15-4616-a5ee-95b3fbeba590 /data           ext4    defaults        0       2

发现所有的分区都是通过ID来标记的,因此基本定位到问题的原因为:添加新磁盘后,之前的磁盘变成了sdb分区,然而系统里面的磁盘ID还是指向开始的sda分区。就导致了分区找不到,系统无法启动。所以最后解决方法就是把所有的UUID都改成当前的分区号:

/dev/sdb4 /                       ext4    defaults        1 1
/dev/sdb2 /boot                   ext4    defaults        1 2
/dev/sdb1 /boot/efi               vfat    umask=0077,shortname=winnt 0 0
/dev/sdb6 /data                   ext4    defaults        1 2
/dev/sdb7 /home                   ext4    defaults        1 2
/dev/sdb5 /usr/local              ext4    defaults        1 2
/dev/sdb3 swap                    swap    defaults        0 0
...

保存重启,然后就好了。

安装esxi途中遇到了找不到网卡驱动的问题:

20180902184932.jpg

这是因为iso文件中本身没有添加当前设备网卡的驱动,如要安装,需要手动导入属于自己网卡的的驱动。

第一步先找到自己的网卡型号:

[ma@centos ~]$ lspci -tv
-[0000:00]-+-00.0  Advanced Micro Devices, Inc. [AMD] Family 15h (Models 10h-1fh) Processor Root Complex
           +-01.0  Advanced Micro Devices, Inc. [AMD/ATI] Richland [Radeon HD 8650G]
           +-01.1  Advanced Micro Devices, Inc. [AMD/ATI] Trinity HDMI Audio Controller
           +-02.0-[01]----00.0  Advanced Micro Devices, Inc. [AMD/ATI] Thames [Radeon HD 7670M]
           +-04.0-[02]----00.0  Realtek Semiconductor Co., Ltd. RTL8111/8168/8411 PCI Express Gigabit Ethernet Controller
           +-05.0-[03]----00.0  Broadcom Limited BCM4313 802.11bgn Wireless Network Adapter

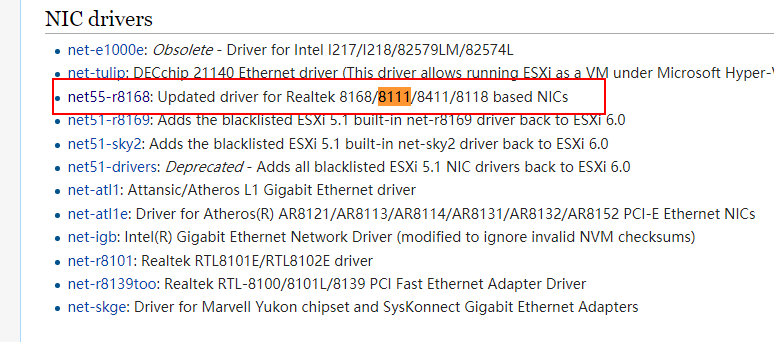
我这里有两块网卡,一个有线网卡 Realtek 8111/8168/8411和一个无线网卡Broadcom Limited BCM4313,不考虑使用无线,就只导入8111驱动。驱动可以在V-Front VIBSDepot wiki中寻找,这里面不仅包含了驱动,还有各种其他相关的工具组件:

PIC20180902_183042.png

进入ESXI package 搜索自己的网卡型号8111,点进去之后选择下载.vib包:

PIC20180902_183233.png

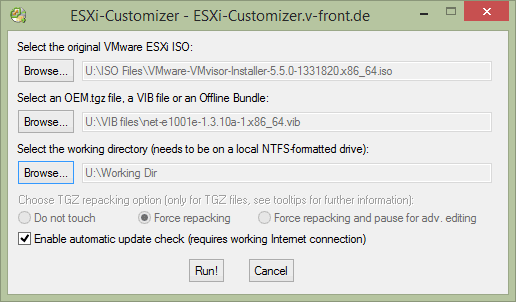
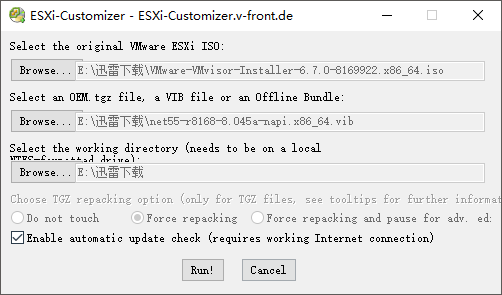
得到net55-r8168-8.045a-napi.x86_64.vib后,要把它加到原始的安装包里去,要用到另一个软件叫ESXi-Customizer,下载地址:v7.2版本下载地址,主界面如下:

ESXi-Customizer-v2.7.2-GUI.png

第一个选择官方的原始镜像,第二个是下载的驱动目录,第三个就是输出文件夹,选好后点RUN就能一键完成,很方便。

关于ESXi-Customizer的使用

ESXi-Customizer下载完成后,双击打开会自动解压出来得到以下文件:

PIC20180902_183835.png

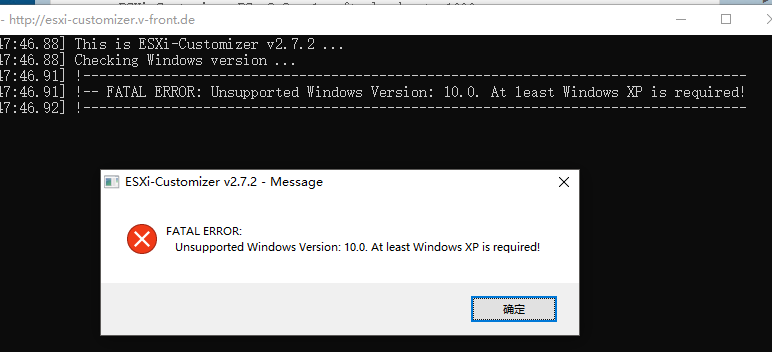
后缀名为 .cmd 的就是启动文件,是一个脚本,默认情况下这个脚本是只能支持的win8.1,win10用户打开会报错:

PIC20180902_144756.png

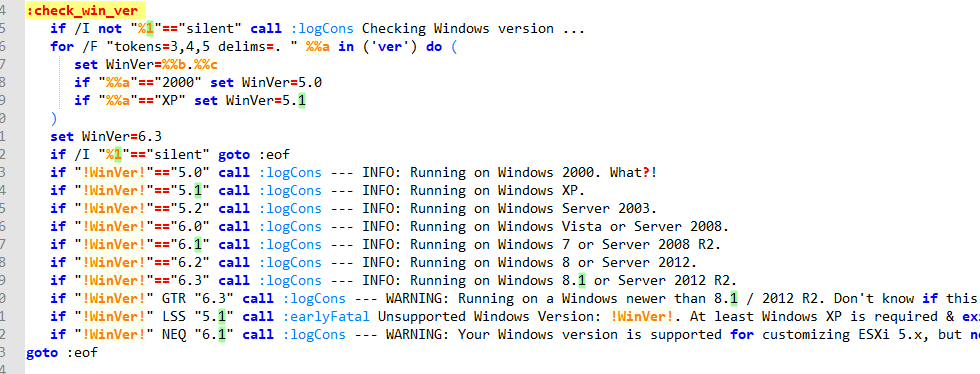
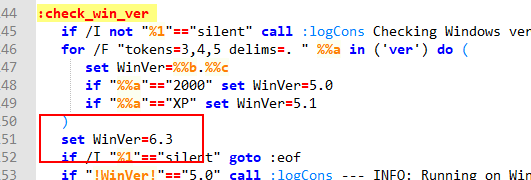
从错误信息上不难看出原因,以一个程序员的经验来说这里一定是脚本校验不通过了, 搜索找到以下位置:

PIC20180902_184252.png

虽然不知道这是什么语言,但从代码结构来看肯定是这里版本校验不通过了,当前的版本为 10.0 ,走到了倒数第三句就退出了。

所以为了避免走到这里就直接在前面获取版本的时候写死成 6.3 ,以win8方式运行(实际上这里也只是打了一个提示语句而已,并不是以win8模式运行):

image.png

果然,重新启动就能运行了,虽然有点显示异常,不过不影响操作:

image.png

ifconfig命令

一、基本用法

ifconfig网卡操作命令,可以用来启动、设置和修改网络配置。

直接使用命令可以查看当前主机所有网卡的信息:

[ma@localhost ~]$ ifconfig 
eth0      Link encap:Ethernet  HWaddr 20:89:84:49:EF:46  
          inet addr:192.168.123.58  Bcast:192.168.123.255  Mask:255.255.255.0
          inet6 addr: abcd::ff03/120 Scope:Global
          UP BROADCAST RUNNING MULTICAST  MTU:1500  Metric:1
          RX packets:919 errors:0 dropped:0 overruns:0 frame:0
          TX packets:419 errors:0 dropped:0 overruns:0 carrier:0
          collisions:0 txqueuelen:1000 
          RX bytes:78144 (76.3 KiB)  TX bytes:47656 (46.5 KiB)

lo        Link encap:Local Loopback  
          inet addr:127.0.0.1  Mask:255.0.0.0
          inet6 addr: ::1/128 Scope:Host
          UP LOOPBACK RUNNING  MTU:65536  Metric:1
          RX packets:0 errors:0 dropped:0 overruns:0 frame:0
          TX packets:0 errors:0 dropped:0 overruns:0 carrier:0
          collisions:0 txqueuelen:0 
          RX bytes:0 (0.0 b)  TX bytes:0 (0.0 b)

其中,eth0是本地网卡信息,lo是本地环回地址,可以直接在命令后面加网卡名查看指定网卡的信息:

[ma@localhost ~]$ ifconfig eth0
eth0      Link encap:Ethernet  HWaddr 20:89:84:49:EF:46  
          inet addr:192.168.123.58  Bcast:192.168.123.255  Mask:255.255.255.0
          inet6 addr: abcd::ff03/120 Scope:Global
          UP BROADCAST RUNNING MULTICAST  MTU:1500  Metric:1
          RX packets:949 errors:0 dropped:0 overruns:0 frame:0
          TX packets:439 errors:0 dropped:0 overruns:0 carrier:0
          collisions:0 txqueuelen:1000 
          RX bytes:80840 (78.9 KiB)  TX bytes:50696 (49.5 KiB)

二、启动/停止网卡

启动和停止网卡的命令为:

ifconfig 网卡名 up # 启动网卡
ifconfig 网卡名 down # 关闭网卡

例如启动eth0,则输入命令ifconfig eth0 up即可。

三、设置网卡的ip地址

如果想要给网卡eth0设置ip地址,可以通过以下方式来实现:

ifconfig eth0 192.168.10.2
ifconfig eth0 192.168.10.2/24 # ip地址+掩码位数
ifconfig eth0 192.168.10.2 netmask 255.255.255.0 # ip地址+子网地址
ifconfig eth0 192.168.10.2/24 broadcast 192.168.10.255 # 指定广播地址

四、多网卡

和windows以下,linux环境下的网卡也可以设置多个ip地址,如需给网卡eth0添加额外的地址,可以通过以下方式来完成:

ifconfig eth0:1 192.168.10.1
ifconfig eth0:2 192.168.10.2

此时,使用ifcofnig即可看到多块网卡:

eth0      Link encap:Ethernet  HWaddr 20:89:84:49:EF:46  
          inet addr:192.168.123.58  Bcast:192.168.123.255  Mask:255.255.255.0
          inet6 addr: abcd::ff03/120 Scope:Global
          UP BROADCAST RUNNING MULTICAST  MTU:1500  Metric:1
          RX packets:1199 errors:0 dropped:0 overruns:0 frame:0
          TX packets:570 errors:0 dropped:0 overruns:0 carrier:0
          collisions:0 txqueuelen:1000 
          RX bytes:102345 (99.9 KiB)  TX bytes:67010 (65.4 KiB)

eth0:1    Link encap:Ethernet  HWaddr 20:89:84:49:EF:46  
          inet addr:192.168.10.1  Bcast:192.168.10.255  Mask:255.255.255.0
          UP BROADCAST RUNNING MULTICAST  MTU:1500  Metric:1

eth0:2    Link encap:Ethernet  HWaddr 20:89:84:49:EF:46  
          inet addr:192.168.10.2  Bcast:192.168.10.255  Mask:255.255.255.0
          UP BROADCAST RUNNING MULTICAST  MTU:1500  Metric:1

lo        Link encap:Local Loopback  
          inet addr:127.0.0.1  Mask:255.0.0.0
          inet6 addr: ::1/128 Scope:Host
          UP LOOPBACK RUNNING  MTU:65536  Metric:1
          RX packets:0 errors:0 dropped:0 overruns:0 frame:0
          TX packets:0 errors:0 dropped:0 overruns:0 carrier:0
          collisions:0 txqueuelen:0 
          RX bytes:0 (0.0 b)  TX bytes:0 (0.0 b)

五、ipv6地址

如果想要给网卡设定ipv6地址,则需通过指定inet6来完成。

添加一个ipv6地址:

ifconfig eth0:1 inet6 add abcd::ff10
ifconfig eth0:2 inet6 add abcd::ff11

查看地址信息:

> ifconfig eth0:1 
eth0:1    Link encap:Ethernet  HWaddr 20:89:84:49:EF:46  
          inet addr:192.168.10.1  Bcast:192.168.10.255  Mask:255.255.255.0
          UP BROADCAST RUNNING MULTICAST  MTU:1500  Metric:1

发现并没有ipv6地址,实际上,ipv6地址信息显示在主网卡上面,要查询eth0才能看到:

> ifconfig eth0
eth0      Link encap:Ethernet  HWaddr 20:89:84:49:EF:46  
          inet addr:192.168.123.58  Bcast:192.168.123.255  Mask:255.255.255.0
          inet6 addr: abcd::ff11/0 Scope:Global
          inet6 addr: abcd::ff10/0 Scope:Global
          UP BROADCAST RUNNING MULTICAST  MTU:1500  Metric:1
          RX packets:1492 errors:0 dropped:0 overruns:0 frame:0
          TX packets:743 errors:0 dropped:0 overruns:0 carrier:0
          collisions:0 txqueuelen:1000 
          RX bytes:128419 (125.4 KiB)  TX bytes:89202 (87.1 KiB)

删除ipv6地址:

ifconfig eth0 inet6 del abcd::ff10/0
ifconfig eth0 inet6 del abcd::ff11/0

一、crontab概述

crontab是linux平台下的定时任务,用于周期性执行任务,基本用法为:

  • crontab -e:编辑当前用户的任务。
  • crontab -l:查看任务是否配置成功。

使用crontab保存的任务配置文件位于/etc/crontab/var/spool/cron/$USER,前者是系统默认带有的,后面是每个用户单独出来文件,这两个文件中的配置都会生效。

默认的文件内容为:

pic_1805241153.jpg

SHELL=/bin/bash
PATH=/sbin:/bin:/usr/sbin:/usr/bin
MAILTO=root
HOME=/
 
# For details see man 4 crontabs
 
# Example of job definition:
# .---------------- minute (0 - 59)
# | .------------- hour (0 - 23)
# | | .---------- day of month (1 - 31)
# | | | .------- month (1 - 12) OR jan,feb,mar,apr ...
# | | | | .---- day of week (0 - 6) (Sunday=0 or 7) OR sun,mon,tue,wed,thu,fri,sat
# | | | | |
# * * * * * user-name command to be executed

任务的格式如其中的注释所示,先是时间配置:分钟 小时 天 月 星期,然后是执行身份和执行的命令,满足条件后系统自动执行。要注意的事项是命令中最好不要带相对路径,否则可能会导致错误。

实际上使用crontab -e就相当于系统帮我们执行了vi /var/spool/cron/$USER,而crontable -l则等价于cat /var/spool/cron/$USER

二、配置文件的编写

每个整点执行ls:

0 * * * * root ls

每两分钟执行一次ls:

*/2 * * * * root ls

三、属于每个用户的crontab

每个用户都有一份crontab文件,在/var/spool/cron/$USER,正常情况下用户也是没有权限访问的,如果要设置属于用户的crontab,则需要通过crontab -e完成。

要注意的一个问题是:编辑属于用户的crontab时,不用再指定执行的用户了,默认就是以当前用户身份运行的。
0 1 * * * ls

一、环境准备

Docker CE支持以下版本的Ubuntu操作系统:

  • Artful 17.10 (Docker CE 17.11 Edge +)
  • Xenial 16.04 (LTS)
  • Trusty 14.04 (LTS)

Docker CE可以安装在64位的x86平台或ARM平台上。Ubuntu发行版中,LTS(Long-Term-Support)长期支持版本,会获得5年的升级维护支持,这样的版本会更稳定,因此在生产环境中推荐使用LTS版本,本次安装的环境为Ubuntu 16.04

二、安装步骤

2.1 使用APT方式安装

卸载旧版本:

sudo apt-get remove docker \
    docker-engine \
    docker.io

- 阅读剩余部分 -

一、问题描述

运行程序时出现以下错误,原因是程序运行时需要的动态库找不到:

./app: error while loading shared libraries: libxxx.so: cannot open shared object file: No such file or directory

解决方案有以下三种。

二、解决方案

2.1 方案1

把需要的库文件复制到系统的默认库路径下:

> sudo cp libxxx.so /lib

- 阅读剩余部分 -

一、时间介绍

unix环境下一共有两种时间值:

  1. 日历时间(Calendar time):该值是自1970年1月1日00:00:00以来所经过的秒数累计值,也叫国际标准时间(UTC,早期的手册称UTC为格林尼治标准时间),这些时间值可用于记录文件最近一次的修时间等,是最常用到的时间。
  2. 进程时间(Process time):也被称作CPU时间,用来度量进程使用的中央处理器资源,它由时钟滴答(clock ticks)表示,每秒50、60或者100个时钟滴答。

通常当我们度量一个进程的执行时间时会包含三种时间属性:时钟时间、用户CPU时间和系统CPU时间。

时钟时间(wall clock time)指进程运行所花费的时间,也就是命令开始执行到结束的时间。它的值与系统中其他的进程数量有关,包括了其他进程所占用的时间和进程被阻塞时所花费的时间。

用户CPU时间是指进程执行用户指令所花费的时间,系统CPU时间则指进程在进行系统调用时占用的时间(例如当我们执行openwrite等函数时)。用户CPU时间和系统CPU时间的和被称为CPU时间。

- 阅读剩余部分 -

pkg-config的作用是列出系统中库的基本信息,例如,查询pcre库的相关信息:

$ pkg-config --libs libpcre2-8
-L/usr/local/pcre2-10.31/lib -lpcre2-8

常用选项为:

  • --list-all:列出所有已安装的共享库。
  • --cflags:列出指定共享库的预处理和编译flag。
  • --libs:列出指定共享库的链接flag。
$ pkg-config --list-all # 列出所有的库地址
lua5.1-rrd       Lua rrd - Lua rrd engine
tic              tic - ncurses 6.0 add-on library
lua51-c++        Lua - Lua language engine
lua5.1-bitop     Lua bitop - Lua bitop engine
ncurses          ncurses - ncurses 6.0 library
lua5.2-bitop     Lua bitop - Lua bitop engine
menu             menu - ncurses 6.0 add-on library
python-3.5m      Python - Python library
systemd          systemd - systemd System and Service Manager
...

$ pkg-config --cflags --libs libpcre2-8 # 找出pcre库相关的文件信息
-I/usr/local/pcre2-10.31/include -L/usr/local/pcre2-10.31/lib -lpcre2-8

- 阅读剩余部分 -